
Migrating Time Machine Backup to a New Disc
Moving a macOS Time Machine backup to a new disc is a headache. Here's how to do it.
Time Machine Transfer Background
Time Machine is equally convenient and extremely frustrating. It’s the easiest way to backup and restore files on macOS. Yet, Apple makes it tricky to manage this over long periods of time. Such a simple thing, moving a Time Machine backup, is entirely unintuitive, and Apple offers no guidance on how to do so.
Indeed, on Apple’s own forums, you’ll find recommendations to just start over with a new disc. Other forums, articles, and Reddit posts recommend the same thing. For a comprehensive backup plan, this isn’t acceptable. It’s also a waste of disc space.
For Apple’s part, they previously had an article titled “Transfer Time Machine backups from one backup disk to another”, but it’s since been removed. So it seems Apple also finds this complicated. I did find, and subsequently lost, a still posted article from Apple claiming that the only way to move Time Machine backups was with the Finder. This would be in contrast to applications like Carbon Copy Cloner, or Terminal utilities like cp, ditto, and asr.
Upgrading to a Larger Disc – My Problem
I use Time Machine on a Synology DS720+ with two 4TB SSD in SHR, in an SMB share. Well, 4TB of backups filled up quickly and I realized I should probably just upgrade to a larger spinning disc. So I went out and bought a 20TB drive before the AI data centers make them any more expensive.
The problem: While Synology’s SHR allows you to swap discs of lower capacity to higher capacity, it does not allow you to mix SSD and HDDs. And even if I could mix and match, I only bought one 20TB drive, and SHR would limit still limit me to 4TB, the smaller of the two drives in the array.
Okay, easy, I thought — I’ll just copy the Time Machine backup (a sparsebundle) from one of the 4TB drives over to the 20TB. Turns out this isn’t easy, but I will walk you through the steps I took that did work. At the end, I’ll cover what didn’t work just in case you’re curious.
As a note, while I do have Time Machine configured on the network, I have no reason to believe this wouldn’t work for directly attached discs.
Requirements:
- SSH access enabled on the Synology (if this applies to you)
- Comfortable at least copy and pasting into a terminal
- Sudo access
- Whatever terminal you’re using will require Full Disc Access in Settings.app > Privacy and Security > Full Disk Access
What Worked
First, I degraded the original 4TB SHR array in Synology by removing one of the discs. You’ll have to mute the beeping. 😉 Then, I put in the new 20TB disc, created a new Storage Pool, volume, and then a new shared folder per Synology’s help article.
I connected to the Synology in Finder with the ⌘K shortcut. If you’re using SMB, this should look something like smb://my-synology-nas.local. You should see the old Time Machine shared folder (in my case, aptly called time-machine) and the shared folder you just created (again, aptly named time-machine-20tb).
Disable Spotlight and Time Machine
I disabled Spotlight indexing for both volumes. This seemed to improve copying speeds when I was doing things via macOS, though perhaps not necessary.
sudo mdutil -i off /Volumes/time-machine
sudo mdutil -i off /Volumes/time-machine-20tb
Then, in Settings.app > Time Machine, I set the frequency to Manual. Don’t want a backup starting while we’re copying, do we?
Start the Copy with rsync
Following that, I SSH’ed into the Synology to actually perform the copy. Doing this on the Synology itself should be faster than mounting both shared folders on macOS and performing the same operation, though I would think it would still work.
As a note on the command:
/volume1/time-machine/NULL.sparsebundle is my source Time Machine backup. This is the one that I want to copy to the destination that is /volume3/time-machine-20tb/
--archivewill preserve permissions and timestamps--hard-linkswill, as the name suggests, preserve hard links--xattrswill perserve extended attributes--info=progress2will give you a nice little overview of how it’s working.
rsync --archive --hard-links --xattrs --info=progress2 /volume1/time-machine/NULL.sparsebundle /volume3/time-machine-20tb/My copy wrote at ~200Mb/s and took several hours.
Confirm macOS Recognizes the Image
Once the copy was complete, I mounted the newly copied sparse bundle and used the terminal application tmutil (man 8 tmutil) to check that the backups were there. The -d flag specified the backup mount point. Without that flag, it’ll check your original source backup. If your Time Machine backup is encrypted, you’ll be prompted for the password at this step.
hdiutil attach /Volumes/time-machine-20tb/NULL.sparsebundle
tmutil listbackups -d /Volumes/Backups\ of\ NULL
You should see output.
Cool. Now, just to gather some more data, I ran tmutil destinationinfo. My output looked something like this.
tmutil destinationinfo
====================================================
Name          : time-machine
Kind          : Network
URL           : smb://Time%20Machine%20User@my-synology-nas.local/time-machine
ID            : 3D6843B7-CDA7-4B36-8183-4A3089CFE208
Just make note of this.
Remove the Old Desination
From here, we need to remove the old Time Machine destination. You should be able to do this via Settings.app > Time Machine and hit that little minus sign by the drive. Or, you can get the Machine UUID from the sparsebundle’s property list by using the plist terminal app (man 5 plist). Note that we’re looking at the OLD source Time Machine backup’s spares bundle. If this isn’t mounted, just double click on the sparse bundle in Finder or mount it with hdiutil.
plutil -p /Volumes/time-machine/NULL.sparsebundle/com.apple.TimeMachine.MachineID.plist
You want to get the Syncable password from that output:
    <key>SyncablePasswordID</key>
    <string>CADE7731-E2F1-44B7-8E93-DEEB4834D27B</string>
Then remove the destination with:
sudo tmutil removedestination CADE7731-E2F1-44B7-8E93-DEEB4834D27BNow we aren’t backing up anywhere.
Add the New Destination
The next step is to set the new destination. Do that with the following:
sudo tmutil setdestination -a “smb://Time%20Machine%20User@my-synology-nas.local/time-machine-20tb”Inherit and Associate the New Sparse Bundle
Almost there. Now we need to unmount the new Time Machine backup’s sparse bundle and remount it as read-write. Note that the source is the NEW Time Machine backup sparsebundle.
hdiutil detach "/Volumes/Backups of NULL"
hdiutil attach -readwrite /Volumes/time-machine-20tb/NULL.sparsebundle
Then, inherit and associate the disc. inheritbackup will claim all of the previous backups for this machine. associatedisc will make sure the UUIDs align and that your Mac will use this disc for backup. For this command, you’ll need to find the /Data folder of the latest backup located in the sparse bundle. For me:
sudo tmutil inheritbackup "/Volumes/Backups of NULL"
sudo tmutil associatedisk /Volumes/Macintosh\ HD "/Volumes/Backups of NULL/LATEST-BACKUP.previous/Data”
For example, for me, that last one was:
sudo tmutil associatedisk /Volumes/Macintosh\ HD /Volumes/Backups\ of\ NULL/2026-03-08-131616.previous/DataUse Finder or the terminal to poke around and find this directory.
Confirm that Everything Worked
The final step is to confirm that everything worked.
tmutil destinationinfo should show the new SMB folder:
tmutil destinationinfo
====================================================
Name          : time-machine-20tb
Kind          : Network
URL           : smb://Time%20Machine%20User@my-synology-nas.local/time-machine-20tb
ID            : AE413874-A13C-4FF6-8945-07A44A766858
tmutil listbackups should show the same number of backups as before (no -d flag needed this time).
To start a backup, you can go into Settings.app > Time Machine or start it via the command line with sudo tmutil startbackup
Oh, bonus final item. In Settings.app > Time Machine, you’ll notice that it will still say 300GB of 4TB remaining, or something like that. If you put in a larger drive, you may wonder where your space went. Well, the sparse bundle has something called specific block count, which is set when it’s created.
You can see this with the following:
hdiutil resize -limits /Volumes/time-machine-20tb/NULL.sparsebundle
Enter password to access "NULL.sparsebundle":
 min 	 cur 	 max
6025904128	32212254720	18014398509072308
You can resize the drive with the following, where the argument passed to the size command is the size of your drive in gibibytes or tebibytes with “g” or “t” (there are other options, in man 1 hdiutil). If you're moving an exbibyte ("e"), good luck.
hdiutil resize -size 15t /Volumes/time-machine-20tb/NULL.sparsebundleTroubleshooting
hdiutil attach hangs after entering password. This is normal, especially for a large, encrypted, bundle. Give it like 15 minutes.
tmutil associatedisk returns "Read-only file system". Unmount and re-mount with -readwrite as described above.
tmutil associatedisk returns "A local volume mount point and a snapshot volume path are required". Specify the path to the Data folder inside the latest backup.
Time Machine wants to start a full backup instead of incremental. Make sure you ran both inheritbackup and associatedisk. Verify with tmutil listbackups. If it shows your backup history, it should do an incremental.
What Didn't Work
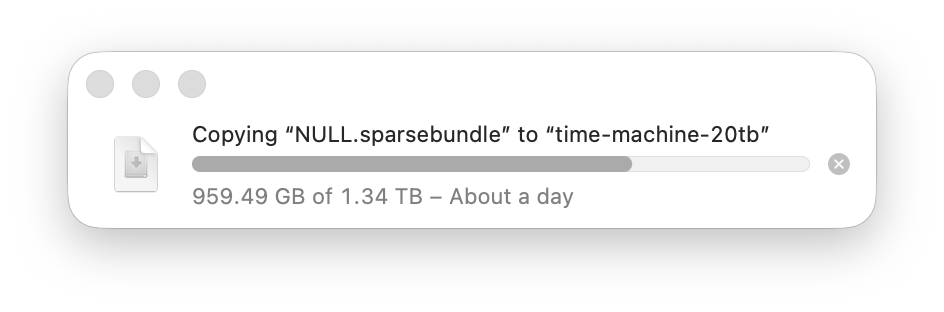
Finder
I mentioned earlier that I did find an article from Apple claiming that the only way to move backups was with Finder. This is great, in theory.
However, the transfer speeds are incredibly slow.
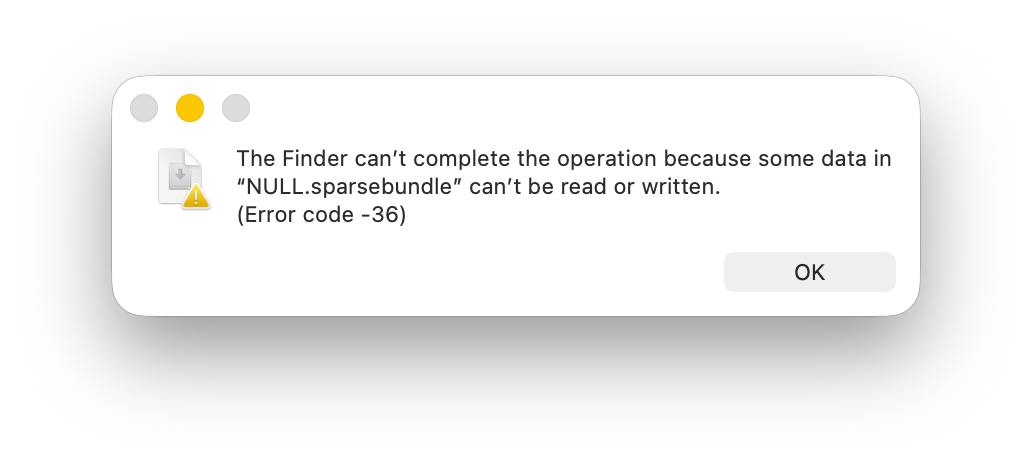
I tried this three times, but kept getting an I/O error. Supposedly, this is related to some hidden file (those usually lead with a .). There's a built-in terminal application dot_clean which could fix this, but I was reluctant to try it on my only working copy.
ditto
Might have worked, but the transfer cut out half way though a multi-day copy. So in may ways, it had the same problems as Finder.